If you're not interested in building the app from scratch, you can get a fully
working demo app by running npm create triplit-app@latest.
Build a Todos app with React, Vite and Triplit
This tutorial will show you how to build a simple Todos app with React, Vite and Triplit. It will cover the following topics:
- How to create a new Triplit project
- How to create a new React app with Vite
- How to create a Triplit schema for the Todos app
- How to use the Triplit console
- How to read and mutate data with Triplit
- How to sync data with Triplit
The app will be built with:
- React (opens in a new tab) as the UI framework
- Vite (opens in a new tab) as the build tool
- Triplit as the database and sync engine
If at any time you want to check your progress against the finished app, or if you get stuck, you can find the source code for the finished app here (opens in a new tab).
Project setup
Create a new project
Let's use Vite to create a new React app. Run the following command in your terminal:
npm create vite@latest todos -- --template react-tsFollow the prompts to create a new project. Once it's been created, navigate to the project directory:
cd todosAdd in Triplit
Before we start building the app, we need to integrate Triplit and its dependencies project. You can do this by installing the Triplit CLI, the React bindings, and running the init command.
npm install -D @triplit/cli
npx triplit init --framework react
This will will create some Triplit-specific files and add the necessary dependencies.
The directory structure for your new project should look like this:
/triplit
  schema.ts
/public
  [static files]
/src
  [app files]
[other files]
Define the database schema
Triplit uses a schema to define the structure of your data. By using a schema, Triplit can validate your data at runtime and provide autocompletion in your editor.
We're going to set up a schema for the Todos app in the ./triplit/schema.ts file. Open the file and replace its contents with the following code:
import { Schema as S } from '@triplit/client';

export const schema = S.Collections({
  todos: {
    schema: S.Schema({
      id: S.Id(),
      text: S.String(),
      completed: S.Boolean({ default: false }),
      created_at: S.Date({ default: S.Default.now() }),
    }),
  },
});
This schema defines a single collection, todos, with the following fields:
id: A unique identifier for the todo. Every Triplit collection must have anidfield. Defaults to a random string if not specified.text: A string that contains the todo text.completed: A boolean value that indicates whether the todo is completed or not. Defaults tofalseif not specified.created_at: A timestamp that indicates when the todo was created. Defaults to the current time if not specified.
Start the development server
Triplit provides a development server that you can use to test your app locally. To start the development server, run the following command:
npx triplit devThis will start the sync server at http://localhost:6543 and a database console at https://console.triplit.dev/local. It will also output API tokens that your app will use to connect to the sync server.
Now's a good time to set up an .env file in the todos directory. This file will contain the API tokens that your app will use to connect to the sync server. Create a new file called .env in the todos directory and add the following:
TRIPLIT_DB_URL=http://localhost:6543
TRIPLIT_SERVICE_TOKEN=replace_me
TRIPLIT_ANON_TOKEN=replace_me
# Replace `replace_me` with the tokens in the terminal where you ran `npx triplit dev`

VITE_TRIPLIT_SERVER_URL=$TRIPLIT_DB_URL
VITE_TRIPLIT_TOKEN=$TRIPLIT_ANON_TOKEN
Make sure you have .env as part of your .gitignore file:
# Ignore .env files
.env
Now restart the development server by pressing Ctrl + C and running npx triplit dev again.
We're basically done setting up Triplit. Now we can start building the app.
The development server automatically loads your schema on startup. If you're
not running a local server, run npx triplit schema push to make the remote
server aware of the schema you've defined.
Building the app
Let's start building the app.
Getting started with Vite
Vite is a build tool that makes building apps fast and easy. We already installed Vite above, so let's start using it.
In a new terminal, in the todos directory, run the following command to start the Vite development server:
npm run devThis will start the Vite development server on port 5173. You can now open your browser and navigate to http://localhost:5173 to see the app.
The Triplit client
Now that we have the development server running, let's integrate Triplit into our client code.
Triplit provides a client library that you can use to read and write data. Let's initialize it with our API tokens and the schema that we defined earlier. Create a new file in the triplit directory called client.ts and add the following code:
import { TriplitClient } from '@triplit/client';
import { schema } from './schema';

export const triplit = new TriplitClient({
  schema,
  serverUrl: import.meta.env.VITE_TRIPLIT_SERVER_URL,
  token: import.meta.env.VITE_TRIPLIT_TOKEN,
});
Any time you want to read or write data, you'll import the triplit object from this file.
Optional: styling
The Vite app template comes with some basic styles. Feel free to replace them with your own styles or some of ours. Replace the contents of index.css with the following:
:root {
  font-family: Inter, system-ui, Avenir, Helvetica, Arial, sans-serif;
  line-height: 1.5;
  font-weight: 400;

  color-scheme: light dark;
  color: rgba(255, 255, 255, 0.87);
  background-color: #242424;

  font-synthesis: none;
  text-rendering: optimizeLegibility;
  -webkit-font-smoothing: antialiased;
  -moz-osx-font-smoothing: grayscale;
  display: flex;
  flex-direction: column;
  align-items: center;
  justify-content: center;
  height: 100vh;
}

.app {
  display: flex;
  flex-direction: column;
  justify-content: center;
  width: 100%;
  max-width: 400px;
  gap: 16px;
}

.todo {
  display: flex;
  gap: 1em;
  align-items: center;
  margin-bottom: 8px;
}

.btn {
  margin-left: 8px;
  border: none;
  border-radius: 0.25em;
  padding: 0.5em 1em;
  background-color: cornflowerblue;
  color: #fff;
  font-size: 1em;
  cursor: pointer;
}

.todo-input {
  border-radius: 0.25em;
  border-color: cornflowerblue;
  padding: 0.5em 1em;
  background-color: #242424;
  color: #fff;
  font-size: 1em;
}

.x-button {
  border: none;
  background-color: transparent;
  display: none;
}
.x-button:hover {
  filter: brightness(1.5);
}

.todo:hover .x-button {
  display: block;
}
Creating todos
The Vite app template comes with an App.tsx file that contains some components. Let's replace it with an <form/> component that creates a new todo.
Replace the contents of App.tsx with the following:
import React, { useState } from 'react';
import { triplit } from '../triplit/client';

export default function App() {
  const [text, setText] = useState('');

  const handleSubmit = async (e: React.FormEvent) => {
    e.preventDefault();
    await triplit.insert('todos', { text });
    setText('');
  };

  return (
    <div className="app">
      <form onSubmit={handleSubmit}>
        <input
          type="text"
          placeholder="What needs to be done?"
          className="todo-input"
          value={text}
          onChange={(e) => setText(e.target.value)}
        />
        <button className="btn" type="submit" disabled={!text}>
          Add Todo
        </button>
      </form>
    </div>
  );
}
This component renders a form with a text input and a submit button. When the form is submitted, it calls triplit.insert to create a new todo. It uses React to update the text input's value and clear it when the form is submitted.
Notice that in the call to triplit.insert, we're omitting several of the
fields we defined in our schema. That's because those missing fields, id,
completed, and created_at, have default values. Triplit will automatically
fill in those fields with their default values.
The Triplit console
We have a component that creates a new todo, but we still need to write some code that fetches the todos from the database and renders them on the page. If we want to test that our insertions are working without doing any more work, we can use the Triplit console.
When you ran npx triplit dev earlier, it started a Triplit console. This is located at https://console.triplit.dev/local. You should see a page that looks like this:
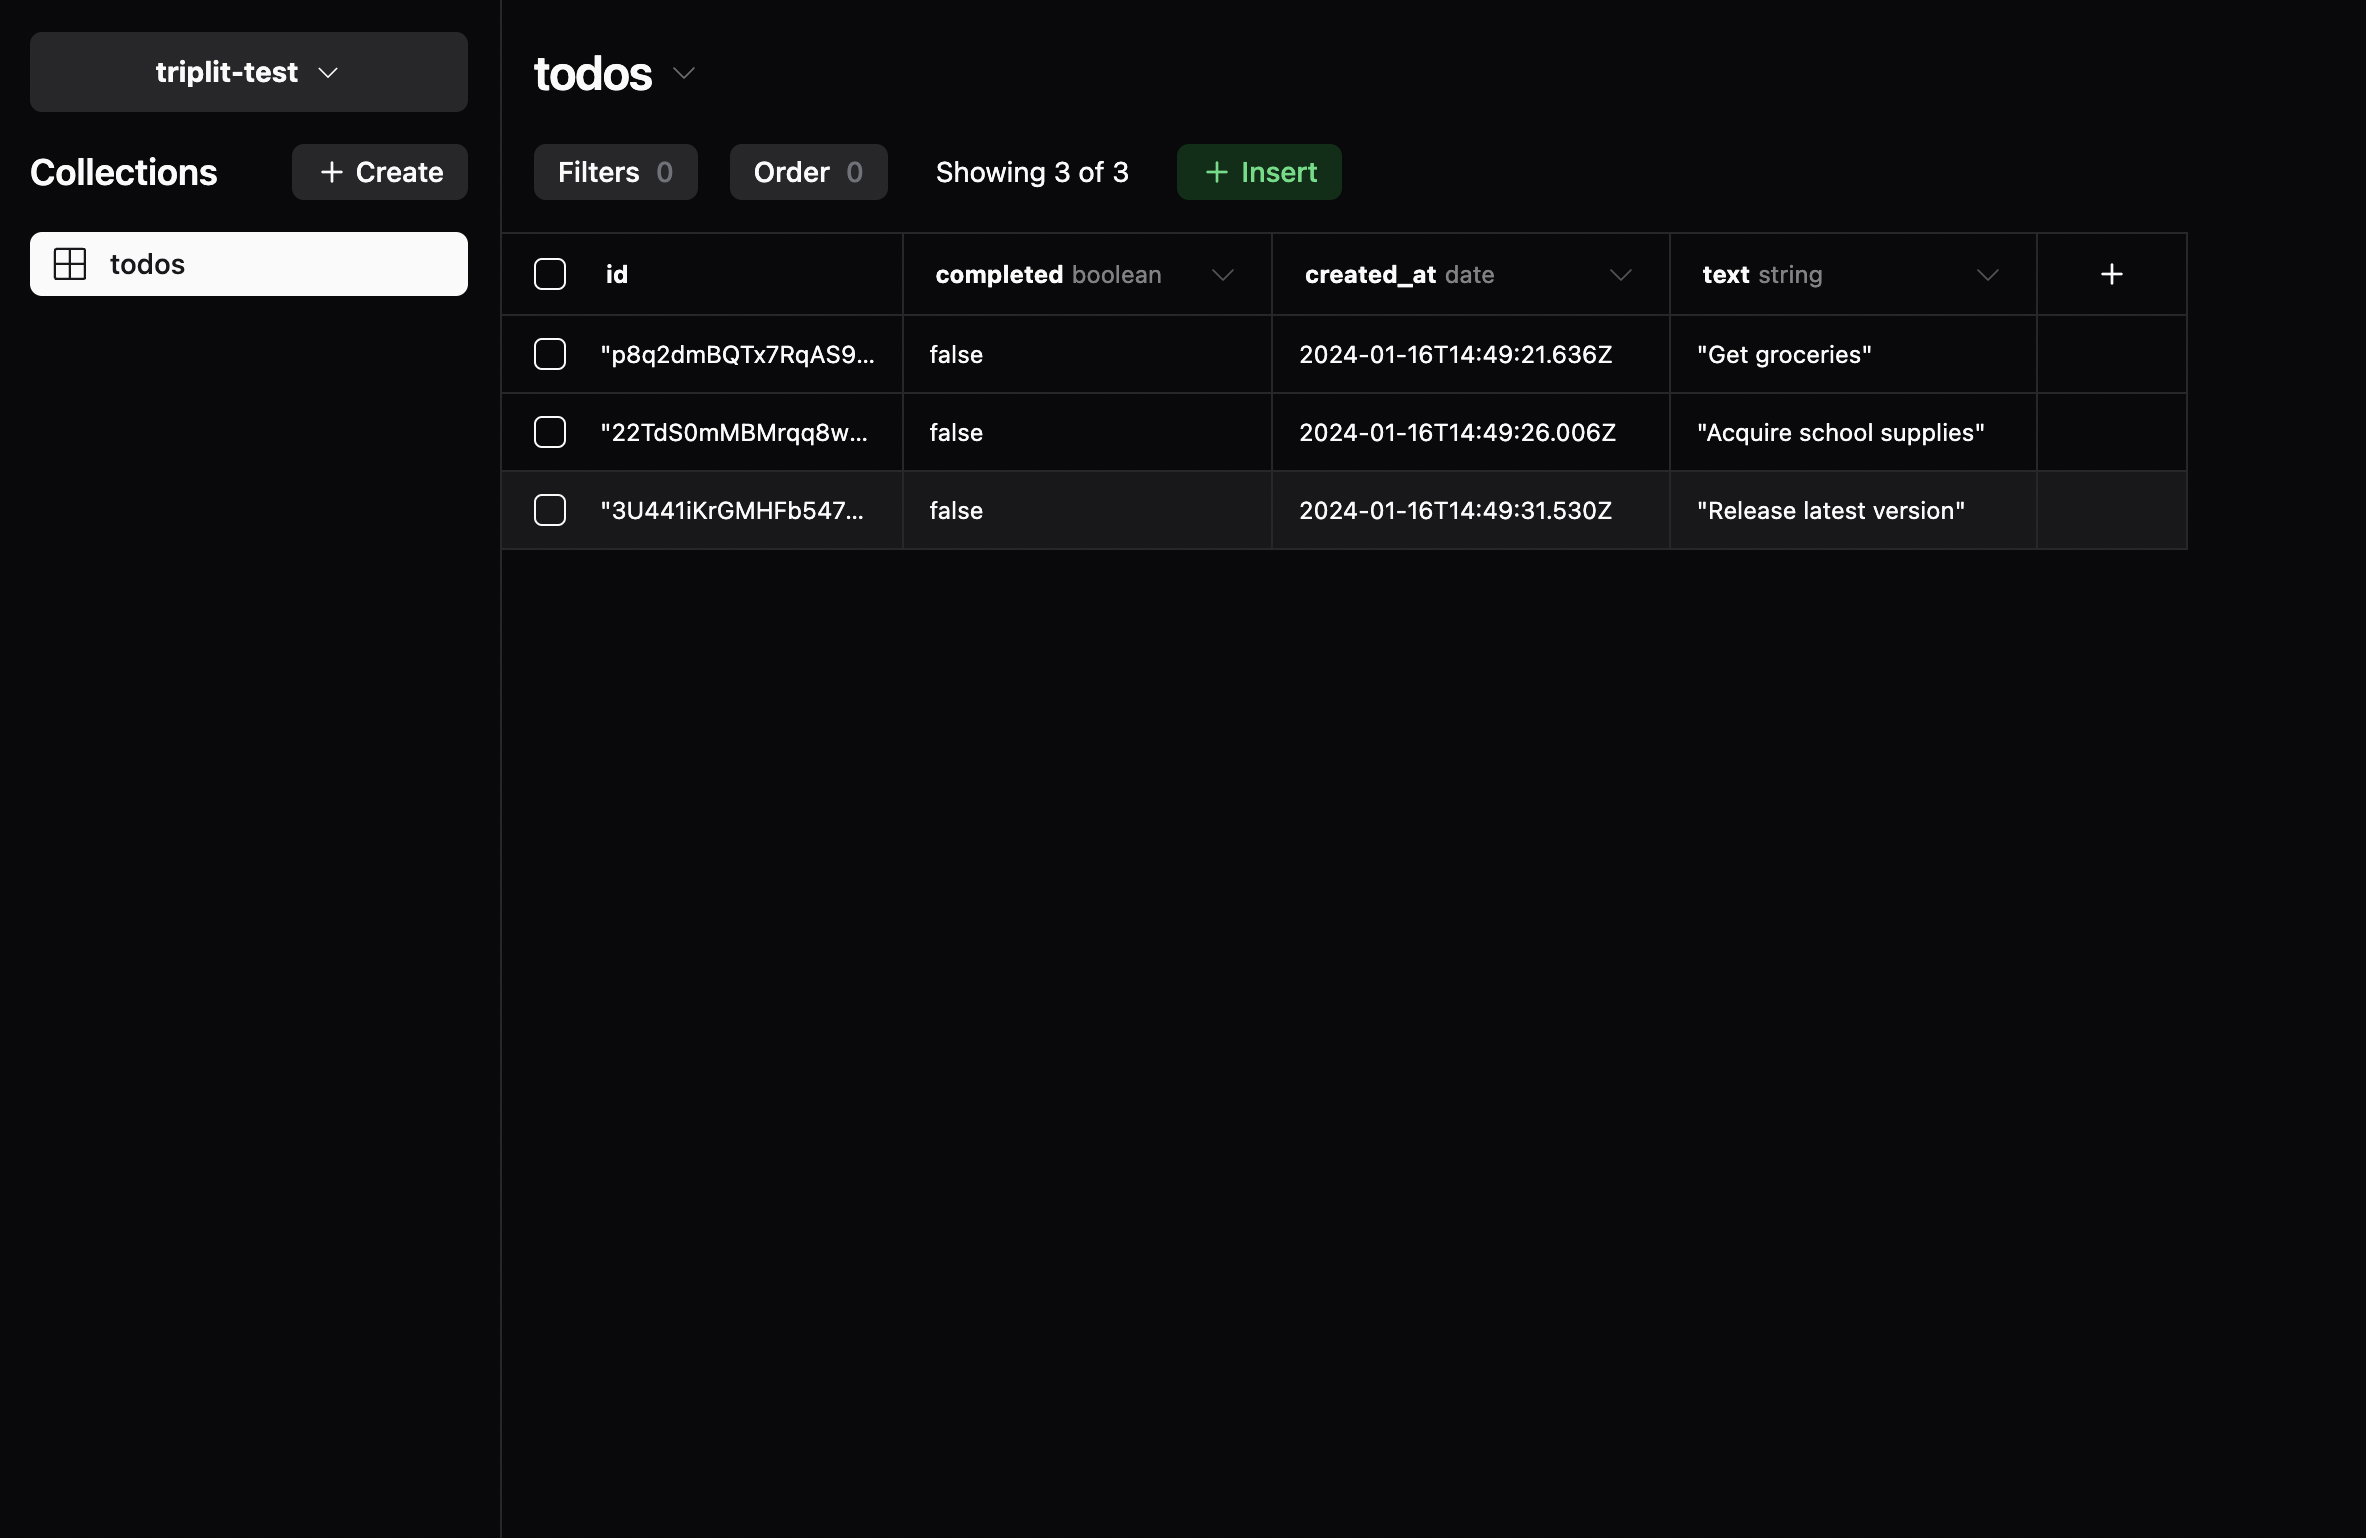
The console allows you to view and edit the contents of your database. You can use it to view the todos that you've created so far. You can also use it to create new todos or update existing ones. Add some todos from your Vite app, and watch them appear in the todos collection in the console. Then, in the console, click on a cell in the new rows that appear and update it.
The Triplit console is super powerful. Not only can you mutate data, but you can apply filters, sorts, navigate relations and more.
Creating a todo component
Now that we have a way to create a new todo, let's create a component that renders a todo.
Create a new components directory inside the src directory and a file called Todo.tsx and add the following code:
import { Entity } from '@triplit/client';
import { schema } from '../../triplit/schema';
import { triplit } from '../../triplit/client';

type Todo = Entity<typeof schema, 'todos'>;

export default function Todo({ todo }: { todo: Todo }) {
  return (
    <div className="todo">
      <input
        type="checkbox"
        checked={todo.completed}
        onChange={() =>
          triplit.update('todos', todo.id, async (entity) => {
            entity.completed = !todo.completed;
          })
        }
      />
      {todo.text}
      <button
        className="x-button"
        onClick={() => {
          triplit.delete('todos', todo.id);
        }}
      >
        ❌
      </button>
    </div>
  );
}
In this component, we're rendering a checkbox and some text describing our todo. The Todo component takes a single prop, a Todo entity, and renders it. To get the Todo type from our schema we use the Entity generic type, and pass in our schema and the name of the collection ('todos') that we want a type for.
When the checkbox is clicked, we call triplit.update to update the todo's completed field. triplit.update takes three arguments: the name of the collection, the id of the entity to update, and a callback that updates the entity.
When the ❌ button is clicked, we call triplit.delete to delete the todo. triplit.delete takes two arguments: the name of the collection and the id of the entity to delete.
Rendering the todos
Now that we have a component that renders a todo, let's render a list of todos.
First, let's query the todos from the database. We're going to use the useQuery hook provided by Triplit to query the todos and store them as React state. At the top of App.tsx, add the following code:
import React, { useState } from 'react';
import { triplit } from '../triplit/client';
import { useQuery } from '@triplit/react';

function useTodos() {
  const todosQuery = triplit.query('todos').Order('created_at', 'DESC');
  const { results: todos, error } = useQuery(triplit, todosQuery);
  return { todos, error };
}

export default function App() {
  const [text, setText] = useState('');

  const handleSubmit = async (e: React.FormEvent) => {
    e.preventDefault();
    await triplit.insert('todos', { text });
    setText('');
  };

  return (
    <div className="app">
      <form onSubmit={handleSubmit}>
        <input
          type="text"
          placeholder="What needs to be done?"
          className="todo-input"
          value={text}
          onChange={(e) => setText(e.target.value)}
        />
        <button className="btn" type="submit" disabled={!text}>
          Add Todo
        </button>
      </form>
    </div>
  );
}
The useQuery hook takes two arguments: a Triplit client and a query. The query is created by calling triplit.query and passing in the name of the collection that we want to query. useQuery returns an object with the following properties:
results: AnArray<Todo>that contains the results of the query.error: An error object if the query failed, orundefinedif the query succeeded.fetching: A boolean that indicates whether the query is currently fetching data.
One thing to notice is that we've added an order clause to the query. This
will order the todos by their created_at field in descending order. This
means that the most recently created todos will be at the top of the list.
Triplit's query API supports a wide range of clauses, including where,
limit, offset, order, and more. You can learn more about the query API
here.
Now we're going to render the todos in the App component. Add the following lines to the App component:
import React, { useState } from 'react';
import { useQuery } from '@triplit/react';
import { triplit } from '../triplit/client';
import Todo from './components/Todo';

function useTodos() {
  const todosQuery = triplit.query('todos').Order('created_at', 'DESC');
  const { results: todos, error, fetching } = useQuery(triplit, todosQuery);
  return { todos, error, fetching };
}

export default function App() {
  const [text, setText] = useState('');
  const { todos } = useTodos();

  const handleSubmit = async (e: React.FormEvent) => {
    e.preventDefault();
    await triplit.insert('todos', { text });
    setText('');
  };

  return (
    <div className="app">
      <form onSubmit={handleSubmit}>
        <input
          type="text"
          placeholder="What needs to be done?"
          className="todo-input"
          value={text}
          onChange={(e) => setText(e.target.value)}
        />
        <button className="btn" type="submit" disabled={!text}>
          Add Todo
        </button>
      </form>
      <div>{todos?.map((todo) => <Todo key={todo.id} todo={todo} />)}</div>
    </div>
  );
}
Here we've:
- Imported our
<Todo/>component - Called the
useTodoshook to query the todos - Rendered the todos by iterating over the array with
Array.mapin our<App/>component.
Triplit queries are live, meaning that you never need to manually refetch data. As other clients insert, update or delete data, your query will automatically update to reflect those changes. Even if you go offline, the query will listen for the changes that you make locally and update the query with those local changes. When you go back online, the Triplit will sync those local changes with the server and pull in any changes it missed while we were offline.
Persisting data
So far, Triplit has been storing data in-memory (the default for TriplitClient). That means that if you refresh the page and go offline, you'll lose your data. Triplit supports a variety of storage options that you can use to persist your data even between refreshes or if you go offline.
IndexedDB (opens in a new tab) is a low level durable storage API built into all modern browsers. Update the client.ts file to use the indexeddb storage option:
import { schema } from './schema.js';

export const triplit = new TriplitClient({
  storage: 'indexeddb',
  schema,
  serverUrl: import.meta.env.VITE_TRIPLIT_SERVER_URL,
  token: import.meta.env.VITE_TRIPLIT_TOKEN,
});
When you use the Triplit client to insert or update data, that data will persist to IndexedDB. Test it out: if you create a few todos and refresh your browser, you should see that your todos are still there.
Testing out the sync
Now that we have a working app, let's test out the sync. In one browser window, navigate to http://localhost:5173. Then, open a private browsing window and navigate to http://localhost:5173. You should see the same app in both tabs. Now, create a new todo in one tab. You should see the todo appear in the other tab. Try checking and unchecking the todo. You should see the changes reflected in the other tab. Triplit works offline as well - try disconnecting from the internet and creating a new todo in one of the windows. You should see the todo appear in the other tab when you reconnect. This is the power of syncing with Triplit!
Next steps
We've built a simple Todos app with React, Vite and Triplit. We've learned how to:
- Create a new Triplit project
- Create a new React app with Vite
- Create a Triplit schema for the Todos app
- Read and mutate data with Triplit
- Sync data with Triplit
And there are still a lot of things that we haven't covered.
- The rest of Triplit's query API to select, filter and paginate data
- Triplit's access control rules to control who can read and write data
- Triplit's transaction API
- Triplit's relational API to establish relationships between collections and then select data across those relationships
- The various storage options for your Triplit client's cache
- How to self-host Triplit
If you have any questions, feel free to reach out to us on Discord (opens in a new tab) or Twitter (opens in a new tab).